Unboxing your new electric bike is exciting. You can already picture that first ride, but a loose front wheel and a handful of nuts and washers can make getting started feel more complicated than you expected.
Our Z8 front wheel installation guide breaks the job into manageable steps, from checking the axle to securing the wheel and testing the front brake. We’ll also explain what to check if the wheel looks uneven, feels loose or makes a rubbing sound, so you know when to make a simple check and when to ask us for help.
Before you begin, check your front axle
This guide follows our video for the 2026 Z8 and Z8 Pro with the nut-style front axle. Watch the step-by-step video instructions here:
Before you begin:
- Power off.
- Bike securely supported.
- Tools ready: correctly fitting 15 mm and 17 mm open-end wrenches.
- Small hardware tray ready for nuts and washers.
- Correct nut-style axle version confirmed against the official video.
Even if you’ve assembled other ebikes, take a moment to identify the outer mounting nuts, their washers and the separate nuts closer to the wheel hub. Keeping those parts distinct will make the next steps easier to follow.
Step-by-step Z8 front wheel installation
1. Remove the outer mounting nuts and washers
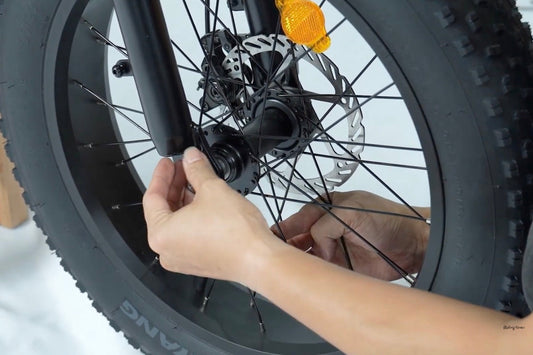
Remove the wheel’s protective packaging so you can see both ends of the axle clearly. Unscrew the outer mounting nut and remove its washer, keeping them together as a pair. Repeat on the other side and place both sets in your tray.
Leave the remaining hub hardware in view. During Z8 front wheel installation, the outer nuts secure the wheel to the fork, while the hardware nearer the hub is involved in the axle preparation shown next.
2. Check and center the axle
Axle safety warning: Keep the axle inside the hub throughout the adjustment. Moving it too far may dislodge or damage the internal bearings. If the hardware does not match, a part comes loose or you cannot achieve smooth movement without looseness, pause and contact support before continuing.
Before fitting the wheel, compare the exposed threaded axle on both sides. Our written front-wheel diagram shows 22.5 mm from the hub locknut’s outer face to the axle tip on each side, measured before fitting the fork and outer mounting hardware. If both sides already match the diagram and the wheel turns smoothly without looseness, leave that adjustment as it is.
If the lengths differ, follow the video’s axle-centering demonstration from approximately 0:20 to 1:40. The sequence is to loosen the indicated hub-side nuts, reposition the shaft carefully, secure those nuts again and check movement by hand. This stage involves the nuts beside the hub, separate from the outer mounting nuts you removed. Keep the close-up visible throughout this part of Z8 front wheel installation and match each nut before turning it. If you cannot identify it confidently, ask us for help.
3. Remove the fork’s shipping brace and position the wheel
Once the axle is prepared, remove the temporary shipping brace between the fork ends, as shown at approximately 1:45. Keep the frame supported while bringing the wheel into position.
Place the brake rotor on the same side as the front brake caliper and carefully guide the wheel into the fork. Check that the rotor enters the gap between the brake pads and that both axle ends sit fully in the fork’s mounting slots, also called dropouts. Avoid forcing the wheel into place or spreading the fork to make it fit.
4. Refit the washers and start the nuts by hand
For Z8 front wheel installation, refit each washer outside its fork end and start the corresponding outer mounting nut by hand. Repeat on the other side, checking that both nuts thread smoothly.
If a nut catches immediately or starts at an angle, stop and check its position instead of forcing it with a wrench. Before tightening, look at the wheel from the front and confirm that it sits evenly between the fork legs.
5. Secure the wheel and check its movement
Use the correctly fitting wrench to tighten the outer mounting nuts on both sides, following the final close-ups in the video. If your supplied instructions do not state a tightening torque, contact us to confirm the value for your axle version.
Support the front end, turn the wheel by hand and check for smooth rotation. Gently check for side-to-side movement at the wheel. Z8 front wheel installation is not complete if the wheel feels loose, binds or shifts in the fork.
6. Check the front brake before riding
Do not ride until the front brake has been tested.
To finish Z8 front wheel installation, apply and release the front brake, then check that the wheel turns again. The brake should engage reliably, and the wheel should remain securely positioned.
Complete the remaining assembly checks before taking a short, controlled first ride in a clear area. Start gently and check braking at low speed. If the brake does not work properly, keep the electric bike parked and ask us or a qualified bike mechanic to inspect it.
Z8 front wheel installation troubleshooting
The wheel will not fit between the fork ends
Check that the shipping brace has been removed and compare the axle preparation with the video. Confirm that you are following the correct procedure for your hardware version. Do not force the fork wider or remove extra hub parts to create space.
The wheel looks off-center or feels loose
Revisit the axle projection and check that both ends are fully seated. If you find looseness after Z8 front wheel installation, stop riding and have the mounting checked. Adding extra washers or repeatedly tightening unidentified nuts can make the original problem harder to resolve.
The front brake makes a rubbing sound
Turn the wheel slowly and observe where contact occurs. Check the wheel’s seating and whether the sound comes from the brake area or another nearby part, such as the fender.
If rubbing remains after Z8 front wheel installation, send us a short video showing the wheel turning and clear photos of both axle ends. Keep oil and lubricant away from the brake rotor and pads. Persistent rubbing, binding or weak braking needs assessment before riding.
Free replacement parts and support
You do not need to work through Riding Times troubleshooting alone. If a part is missing, damaged or difficult to identify, email support@ridert.com or use our customer support page.
Include your order number, model, a short description and clear photos or video. For a Z8 front wheel installation question, showing both axle ends and the brake side helps us understand your setup.
Approved warranty replacement parts carry no charge for the part itself, but shipping charges may apply. Eligibility depends on your purchase and the issue, so contact us before ordering. Our warranty policy explains the conditions, and the official parts store lets you browse available replacements. Confirm compatibility with your axle version before purchasing.
More help with Z8 Pro assembly
If you are continuing with Riding Times Z8 Pro assembly, our 2026 Z8/Z8 Pro unboxing and front-wheel installation video provides another official setup reference. You can also find model-specific resources in our assembly videos and manuals.
For specifications and current availability, visit the Riding Times Z8 Pro fat tire electric bike page. Keep your own model and axle version in mind when choosing instructions or replacement parts.
Frequently asked questions
Does this Z8 front wheel installation guide cover the Z8 Pro?
Yes. Our official video covers the 2026 Z8 and Z8 Pro with the nut-style front axle. If your wheel uses a quick-release lever, use the instructions for that version instead.
How much threaded axle should project on each side?
For this setup, measure 22.5 mm from the outer face of each hub locknut to the axle tip, before fitting the fork and outer mounting hardware. Use the written diagram and video together, and contact us if your hardware differs.
Can I ride if the front wheel still rubs or feels loose?
Finish the Z8 front wheel installation checks before riding. Persistent rubbing, looseness, binding or unreliable braking should be assessed by support or a qualified bike mechanic.
Are replacement parts always free?
Approved warranty replacements carry no charge for the part itself, although shipping may apply. Contact support to check eligibility and the correct part before placing an order.